Saturday, May 4, 2013

UBCD396XT - First Time - Removing Unwanted Systems

UBCD396XT - First Time - Removing Unwanted Systems
The UBCD396XT comes pre-installed with data from Uniden to get you up and running straight out of the box, but some of this data is out dated and useless in most areas.
You will notice the first time you switch the scanner on and push the Scan button it will start scanning all the pre-loaded Systems... problem is that the scanner contains data for each state of Australia and New Zealand.
This means that if you live n Tasmania - the pre-loaded NSW system is of no use to you at all... so the scanner has to go through all the NSW data and the other states before it returns to the Tasmanian data.
You need to remove the System that has no relevance to your area.
This not only makes the Scanner do its job quicker - it also stops the scanner from picking up transmissions in your area and showing them under a different System (State) name.

For example the NSW System may have 413.3750 in its data base and the SA System may also have 413.3750 in its database.. problem is that the NSW System may be allocated in the scanners database, before the SA System.. as the scanner goes through the data, someone in SA (Where I live) may talk on 413.3750 but it will appear as NSW on the screen..  that's why it's good to remove the unwanted pre-installed data before you start using the scanner.

Its easy enough to do and will save you a lot of headaches!
Depending on where you live - only remove the Systems that are of no relevance to you - as I live in SA I want to remove everything but the SA data.

Turn the scanner ON.

Menu will be displayed at the top of the screen.

Program System will be highlighted as shown below....


Push YES

Select System will be written at the top of the screen.

ACT-Public will be highlighted.
-------------------------------------------------------------------------
Hint/Tip
Scanner has the following Systems Pre-installed.
ACT- Public
NSW Public
NSW-GRN MOT
NT Public
NZ Public
QLD Public
SA Public
SA-GRN MOT
TAS Public
VIC Public
WA Public
NEW SYSTEM (this is for NEW Data to be entered-will cover this one later)
------------------------------------------------------------------------

To remove the SYSTEM that you don't require, use the dial and rotate it clockwise or anticlockwise and Highlight the SYSTEM you wish to delete.

Lets delete NZ Public. (No offence to New Zealanders)
but as you can understand NZ Public has no relevance here in Australia - so lets delete it!

Highlight NZ Public.

Push YES

NZ Public will be displayed at the top of the screen.

Use the dial and rotate it clockwise unitl Delete System is highlighted.

Push YES

Confirm Delete will appear on the screen asking you YES or NO.

Push YES

Processing Please Wait will appear on the screen. Depending on the size of the System you are removing this may take a few seconds up to a Minute for larger ones like the NSW GRN MOT.

The screen will then revert to the previous MENU Screen.

Program System will again be highlighted as shown below....


Push YES

Now you can select another SYSTEM to delete using the same method as before.

Once the all the Systems that are no longer relevant have been removed and the screen returns to the Main Menu screen where we started - Push the SCAN button.

The scanner will now start scanning the remaining system relevant to your area.


Hit/Tip
The data base that is pre-loaded into the new UBCD396XT was 'carried over' from the older UBCD396T model and may still contain out dated data. Removing a System may not resolve all problems.
It is known that the Pre-installed NSW-GRN MOT database is out dated and is now using a different system all together now (Apco25) I have also been told that most of the Tasmanian data is also useless.
I did however find that the SA-GRN MOT data base was correct and up only requires entry of a couple more updated frequencies to make it work perfect.

Thursday, February 14, 2013

Custom Search - A Good Starting Point


CUSTOM SEARCH

HOW TO FIND NEW AND UNLISTED FREQUENCIES!


One of the great things about scanning is finding new frequencies that are not listed on any websites or registered with the ACMA.
Searching for new frequencies is a bit like fishing! You cast the net and see what it finds.

With the UBCD396XT it makes finding new frequencies easy and with 10 different search options you won't miss a thing!

For some of you who have used the older style scanners you would be familiar with the 'Limit Search' option.
You could set the scanner to search between two designated frequencies.
For example - if you wanted to search for activity between 70.00 Mhz and 80.00 Mhz you simply entered the two frequencies and the scanner would search between the two - usually with the pre set 'Step' size and 'Modulation' that was factory configured with the scanner.. not giving you too many options!

Now until told differently the scanner would keep searching all day long between these two designated frequencies until someone talked.

The scanner would then stop on that frequency while there was a voice transmission, perhaps giving you just enough time for you to reach for a pen to write down the frequency being used. You could then make a list of all the ones you found and then enter them into the scanners memory at a later stage.
--------------------------------------------------------------------
Hint/Tip
Step size means the allocated space between each frequency.
For example 70.0000Mhz with a 10kHz Step would mean that the next frequency would be as follows:
70.0100 then 70.0200 then 70.0300 then 70.0400 then 70.0500 - get the picture?
If you set the Step Size to a higher setting like 20 kHz, the space between the frequencies would be wider.
Setting a wider or bigger step size means the scanner will zip through the two pre-set frequency ranges quicker but may miss a transmission if its broadcast on the 10Khz step size..
Don't be too concerned about this at the moment as the UBCD396XT has the step size automatically covered. It's more for the 'PRO' user who wishes to 'tweak' the search for a specific reason.
Modulation means the type of band that the transmission can be heard on. Simply put - your good old radio that you may listen to the Saturday footy on has two Modulations - FM and AM.
The UBCD396XT has also got this covered as the pre set Modulation will correspond with the bands you wish to search - again, only the 'PRO' user would want to modify it.
The UBCD396XT will cover the following Modulations - AM,NFM,FM,WFM and FMB.
------------------------------------------------------------------
The UBCD396XT is a very clever scanner - not only will it let you search 10 different 'Limit Searches' it will also let you put them into a pre-configured System for 'scanning' at a later date.
You can also configure the scanner to include the selected 'Limit Searches' with its normal scanning!
-------------------------------------------------------------------
Hint/Tip
Just for the record - 'Limit Search' actually is called 'Custom Search' on the UBCD396XT.
From this point on it will be referred to a 'Custom Search'.

-------------------------------------------------------------------

Lets set up a 'Custom Search'!

The UBCD396XT has already got the UHF 80 Channel CB Radio frequencies pre-installed, but for this example I will set up a 'Custom Search' using the same frequency range. I will use these frequencies as an example as they are all used Australia wide and should produce results pretty quickly once the search has commenced.


The range we will search between will be 476.4250 and 477.4125.

Turn the scanner ON.

Push the MENU button on the left hand side of the scanner.

Using the dial on the top of right hand side of the scanner - turn it clockwise unitl Search for... is highlighted.

Push YES

Search For will be displayed at the top of the screen.

Using the dial rotate it clockwise until Edit Custom is highlighted.

Push YES

Select Custom is now displayed on top of the screen.

Custom 1 should be highlighted.

Push YES

Custom 1 will be displayed on the top of the screen.

Edit Name will be highlighted.
------------------------------------------------------------------
Hint/Tip
I won't go into detail about how to change the name as I have already covered this in another section.
Obviously giving the 'Custom Search' a name will make it easier to reference at a later date - if you are going to change the name I might suggest simply calling it UHF 80CH. If you give it a name this will also display on the screen if you link it to the scanners normal 'scanning' procedure... more on this later.
------------------------------------------------------------

Using the dial, rotate it clockwise until Edit Search Limit is highlighted.

Push YES

Set Lower Limit will be displayed on the top of the screen.
At this point here you can now type in your new 'Lower' frequency.
Type in 476.4250 and push YES.

The screen wil now display Set Upper Limit.
repeat the process and type in 477.4125 and push YES.

The screen will revert back to the previous menu with Custom 1 written at the top of the screen (If you changed the text previously it might display UHF 80CH as I suggested?)

Push the MENU button Once.
The screen will revert back to the previous menu with Select Custom at the top of the screen.
Push Menu again.
The screen will revert back to the previous menu with Search For at the top of the screen.
Rotate the dial anti clockwise (moving the highlightup) and highlight Custom Search.
Push YES.
The scanner will now start searching between the two frequencies we just entered.
If you look along the bottom of the screen you will see the following numbers:
1 2 3 4 5 6 7 8 9 0
These numbers represent the active 'Custom Searches' currently in operation.
To deactivate the ones not required simply push the corresponding number on the key pad.
As we are only interested in searching the one we just created we should deactivate the others as follows:
Push the following kepad numbers - 2 3 4 5 6 7 8 9 0, this will now only leave 1 on the bottom of the screen.

The scanner is now doing a 'Custom Search' between  476.4250 and 477.4125.
If you changed the name in the previous menu settings to UHF 80CH as I suggested, this will be displayed at the top of the screen, instead of Custom 1.
Provided you have someone in your area using a UHF CB, you should hear something within a few minutes.

When you hear an active frequency push the HOLD button to stay on that frequency.
To initiate the search again - push HOLD again and the scanner will search the range again.
If you push the Scan button the scanner will go back into scan mode and you will have to go back to Custom Search via the menu again - repeating the steps as discussed previously.

Now that you have mastered the 'Custom Search' you can change all 10 pre-installed searches with your own search ranges!

Hint/Tip


Remember! To activate your 'Custom Searches', push Menu.
Scroll the dial clockwise to Search For, push YES.
Scroll the dial clockwise to Custom Search, push YES.
This will start the search.
To deactivate a particular search push the corresponding keypad number.
To re-instate the particular search - repeat the process and use the keypad again.
If you hear a voice - push HOLD! To start the search again - Push HOLD again.

To go back to scanning your pre-programmed systems - push SCAN.

I will talk about saving the found frequencies and 'linking' the custom searches to your normal 'scanning' in another chapter.

Sunday, December 16, 2012

Basic Settings. Making the most of your scanner

Everyone wants to hear something straight away - while this may not always happen, here is a little tip to get you 'fishing' straight away.


Lets just say your curious to see what you can find in the 70Mhz range in your local area.. this may be quiet at night time so perhaps best try it during business hours..

Turn the scanner ON.

If it does not start scanning automatically - Push SCAN.

Now Push HOLD.


While the scanner has stopped and 'HOLD' is displayed in the top left hand side of the screen, type in 70.0000.
 'Direct Entry' will appear on the screen as shown below....once you have typed in 70.0000, push HOLD again.


It does not really matter what frequency you type in - the results will be the same


The scanner will automatically choose the correct modulation (AM/FM/NFM etc) and the frequency step size.. 

Quick Search will now appear on the screen as shown below.


To search push the HOLD button once again...

The scanner will now commence a quick search either up or down the frequency range.
To scan up - Turn the dial Clockwise (Right).. to scan down - turn the dial Anti-Clockwise (Left).

Once the scanner finds an active frequency it will pause until you rotate the dial Left or Right again.
If it is something of interest and you wish to listen/monitor it - push HOLD.


Once the transmission is finished - push HOLD again to resume searching.
Remember to rotate the dial Left or Right depending on which direction you wish your search to go...

If you find something of interest that you wish to save - Push the HOLD button when the transmission is active.
While in HOLD mode - Push YES.

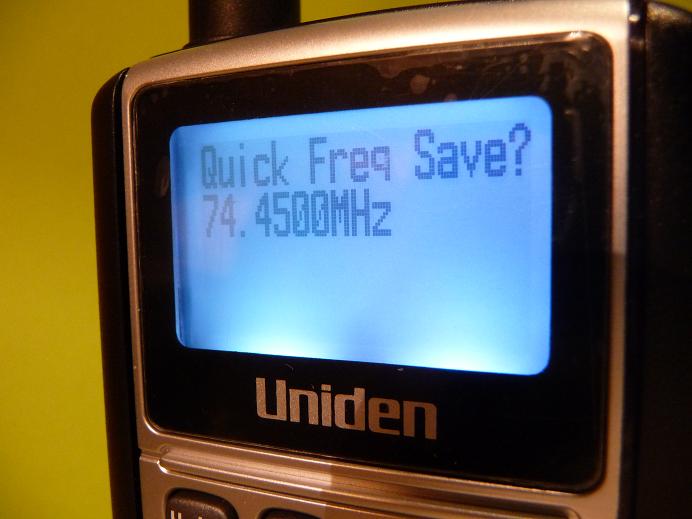
The screen will now change and display 'Quick Freq Save' as shown below


If you wish to save the frequency - push YES and the frequency will be saved into the scanners 'Quick Save' memory.

Of course you can still save the frequency the old fashion way, by simply writing it down manually on a notepad and enter it later into the designated 'System' you wish to save it in....

Once you have finished playing with the 'Quick Search' feature - push the SCAN button to return to normal operation.

At any time you make a mistake - simply push the SCAN button and start again.

During a 'Quick Search', the Scanner will only search in the pre-set factory default modulation and step sizes.
In most cases this will be fine - if it is a particular odd frequency your searching - you may wish to create a custom search. This is covered in another section.

CONTROL CHANNEL SEARCHING.
Applies to trunking Systems including the NSW -VIC (MMR) and SA Government Radio Network

Quick search is also a good way to quickly find active control channels in your local area.
Users in NSW, Metro Melbounre  and SA may find this a quick way to find the strongest control channel in their area.
Control Channels are what makes the scanner lock onto the radio networks data channel.

To find a control channel, follow the same procedure as shown above but start your search at 400.0000 and search up the range. (Rotate the dial Clockwise)
You will hear when the scanner finds a Control Channel as it will stop on a 'Noisy' computer generated sound that simply wont stop...
While it has paused on the control channel - make a note of the frequency and write it down  also have a look at the signal meter on the top right of the screen - the more bars the better the control channel reception.
To see if there are any more control channels within your range - simply rotate the dial clockwise again to continue up the search range to see if there are any more..
Generally there is only ONE of any real use - however if you are using an external antenna, you may come across two or three depending on your location - always make a note of the 'strongest signal'.

The most powerful signal you find is generally the best Control Channel to use.
The information you gather here may assist in setting up your Trunking System.


----------------------------------------------------------------------------------------


Setting the Squelch.

Setting the Squelch to the correct level can make all the difference between
receiving what you want to hear and what you don't.
If the Squelch is set to low, the scanner will stop on every little annoying 'noise' it hears... having the squelch set to high can make the scanner too 'fussy' and it may skip straight over some transmissions...
I usually set mine to around 6 or 7.

It's simple enough to do by following this procedure.

Turn the scanner - ON

Put the scanner into scan mode by pushing the Scan button (if its not already scanning)

On the left hand side of the scanner - push the FUNC button.

A small 'F' will appear on the top left hand side of the screen.

While this 'F' is displayed push the Rotary dial down - you will hear it make a small 'click' as its pressed down.

--------------------------------------------------------------

Hint/Tip
The Rotary dial is located at the top of the scanner - it has Sel/Vol/Sql written to the left of it.
This dial has two main functions - it can be turned left or right or pushed down to help make and confirm settings.
In some cases it can also double up as a 'YES' button to help confirm selections.---------------------------------------------------------------

SQUELCH LEVEL will be displayed along the bottom of the screen and a small horizontal bar graph.
Rotate the Dial left or right according to your required setting.
A number will also appear on the left hand side of the bottom of the screen to also indicate the setting level.
Once the correct level has been set - Push the  Dial once again to save your settings.

The squelch has now been set.

-----------------------------------------------------------------------------------------


Changing the Screen Colour.

Don't like the current colour of your scanners screen?
The UBCD396XT lets you change your screen to suit your mood!

To change the colour follow these instructions.


On the left hand side of the scanner - push the FUNC pad.


The screen will now display the MENU
Using the Rotary dial (Volume control) turn it clockwise until
Settings is highlighted as shown below.


Once Settings has been highlighted - Push YES
The screen will then change to display Settings at the top. (as shown in the picture below)
If not already highlighted - use the Volume dial to highlight
Set Backlight, then push YES.


The screen will then open up the Backlight menu as shown below.


Using the Volume dial - trun it clockwise unitl Set Color is highlighted
(Yes Color is spelt the American way)
----------------------------------------------------------------

Hint/Tip
You will notice that there are a couple other settings in the Backlight Menu. These include setting the Mode and the Dimmer.
If you highlight Mode - and push Yes, a new menu will open up letting you select the time the backlight stays on and when it will be activated.
10 Sec - Backlight stays on for 10 seconds.
30 Sec - Backlight stays on for 30 seconds.
Squelch - Backlight comes on when squelch opens - someone talks.
Keypress - Everytime you press a key the backlight will come on for the designated time pre-set earlier.
Infintie - Stays on all the time.
Trick is to set the time first..  say you want the backlight to stay on for 10 seconds only...
Highlight 10 Sec and push Yes.
Screen will revert back to previous menu.
Highlight Set Mode again and push Yes.
Now we want the Backlight to come on only when the squelch is open - when someone talks.
Highlight Squelch and push Yes.
Screen wil revert back to previous menu again.
The Backlight has now been set to come on for 30 seconds when someone talks.

Setting the Dimmer is just as easy.
While in the Set Backlight Menu -Highlight Set Dimmer and push Yes.
A new Menu will open up with three choices High, Middle and Low.
Using the Volume dial highlight your desired backlight brightness and push Yes.
Screen will revert back to previous menu and we can continue to the next step to change the colour.
------------------------------------------------------ 

Changing the colour of the screens backlight is quite simple at this point.
Simply make sure that Set Color is highlighted and push Yes.
The menu will now let you scroll between the following colours...
White - Yellow - Cyan - Blue - Red  - Magenta - Green
Once you have selected your desired Backlight colour you can then push Yes.
The colour of the backlight has now been set.
Push your Scan button to resume 'scanning'.

Here are some examples below.


Ok..so whats the point? Glad you asked.
You can also set the backlight colours for different frequncies and talk groups.
For example, I have my backlight set to glow RED when the Fire Dept are talking and BLUE for the Ambulance.
I will often leave the volume down quite low and when I see the screen glow or flash RED or BLUE I know its a frequency that I may wish to monitor - I can then pick up the scanner and adjust the volume so I can hear the conversation.
Very handy when watching TV and don't want to be bothered by the scanner in the background, unless it's something important, simply set the backlight colour to your favourite frequency and monitor the colours!


------------------------------------------------------------------------------------------------------------------------


Saturday, April 21, 2012

UBCD396XT - TALKGROUPS & ID'S


How to add a Talk Group Name and a Talk Group ID.


The beauty of a TrunkTracking scanner is that it has the abiltiy to follow the conversation correctly and in most cases  display the 'Talkgroup ID' of the person/service talking.
The UBCD396XT is ideal for searching for new TalkGroup ID's.. but how do I store them?


If you have already programmed your scanner to follow a particular 'system' - for example the SA GRN or NSW GRN, you would have already noticed that when there is activity a 'number' will appear on the screen while they talk.
This number is the 'Talkgroup ID'.
(Scanner MUST BE in 'ID SEARCH' mode - see section below in BLUE)


To use an example - one of the most common ones found on the SA GRN is the number '42992' - This number represents the SA Ambulance 'Tasking' ID for the lower half of SA. 
Everytime a new job is dispatched this number will generally appear on the screen.


Now you could simply download the Freescan software and enter all the data via a computer - this is by far MUCH MUCH easier and less time consuming - but not everyone may have a computer with them when they are listening - especially when a new talk group may be found while out in 'the Field'.


Storing the talk group to the Scanners memory gives you the flex-ability to add a alpha tag (Name) to it - so you can actually see the name of the group that is active and also gives the user the ability to use the scanner to only monitor the actual talk groups saved...


For example - A local Tow Truck operator recently asked me to update his older UBCD396T scanner to receive the SA GRN... His only request was to listen to the SA Fire Dispatch - SA Ambulance Dispatch and the Local SES dispatch.. a total of THREE talk groups only!
After entering the three talk groups into his scanner he asked me how to stop the scanner from hearing all the other talk groups on the GRN...
I advised him to set the scanner to 'ID Scan' only - that way the scanner will only open the squelch when either of the three installed talk groups actually transmit.


Seemed kind of a waste to have only THREE active talk groups entered into this scanner - but that's all he wanted to hear. He wasn't interested in listening to anyone else - only what effectively 'made him money'.


By saving your favourite talk groups to the scanners memory you can do virtually the same as the Two Truck Operator did - set the scanner to only monitor the saved talk groups.
You may be a big fan of the CFS/CFA and MFS - so listening to other talk groups may be of no interest to you at all..
So if you enter only the CFA/MFS talk groups - set the Scanner to 'ID Scan' .
Once the scanner is set to 'ID SCAN' you will hear nothing else but the CFS/MFS talk groups that you entered..
Make sense?


Tip:
When the Scanner is in 'ID Search' mode - it picks up EVERYTHING you have saved and anything else that it finds.
'ID Scan' will only listen to what you have saved - nothing else!


You can switch between 'ID Scan' and 'ID Search' by pushing the Function Button on the top left hand side of the scanner and then push the 'scan' button.
If your scanner is currently showing 'ID SCAN' scrolling across the screen, it should change to 'ID SEARCH'... or visa versa...
You can only change between the two modes when the scanner is  Trunk Tracking a system.. it will not work in conventional mode!
--------------------------------------------------------------------------------------------------------------------------


Creating  Talk Groups 


Before you attempt to save any  IDs to the scanners memory it would probably pay to create some 'talk groups'


Talk groups are where the relevant talk group IDs will be stored.


Talk Groups are simply adding an extra file to the system you have already created..
Talk Groups could be called 'FIRE' Ambulance' Police' 'SES'... etc etc..
When you create these Talk Groups you can then store each actual talk group ID found into its respective group in the scanners memory.


For example.
Your 'SYSTEM' is called 'SA GRN'.
A Talk group is a group of users within the 'SYSTEM'.
That Talk group could be the 'SA Ambulance'
Inside the SA Ambulance Talk group, there are other individual users who come under the same 'Job Description'.
These could be Ambulance dispatch, the Royal Flying Doctors is also under the same 'banner' as the SA Ambulance...
Each one of these users inside the actual Talk group has their own individual ID (and even there own radio ID- but that's another story)


Below is a very 'crude' breakdown' of how the SYSTEM is structured in the scanners memory.
First you create a 'System'
Under that 'System' is a 'Talk Group'
Inside the 'Talk Group' are the users of that 'Talk Groups' relevant ID numbers, with their own independent 'Apha Tags' (names).


Here is how to create your very own 'Talk Group'.


I will use the example of my already installed SA GRN system (SA Government radio Network - Motoroloa type II), but the principle is virtually the same for the NSW GRN and most other trunking systems.


PUSH MENU
highlight Program System
Push YES


Select System Menu will appear.
Highlight SA GRN - (or your particular Trunking system)
Push YES


SA GRN will apear on the top of the screen (or your particular trunking system)
Using the Volume Dial - turn it clockwise to highlight Edit Group
Push YES


Select Group will appear on top of the screen.
Using the Volume Dial - turn it clockwise to highlight New Group
Push YES


Processing Please wait will appear for a few seconds...


Group and a Number will apear on the top of the screen - First time will always say Group 1
Highlight Edit Name
Push YES


Edit Name will now appear on top of the screen.
Push the .NO button twice to erase the current display.
Enter AMBULANCE (or whatever name you wish to call the group) and push YES.


(Remember how to enter Text? - Use the Rotary Volume dial to select the text and the 6 button to move across the screen - make a mistake - push the .NO button once to remove the last input)


Once you have named the new Group, push YES


Now push Scan.


Now the scanner should be in 'ID SEARCH' mode - you can see this by the words 'ID SEARCH' scrolling across the screen.


Hint/Tip:If it says 'ID SCAN', push the Func button on the top left hand side of the scanner and push the Scan button - this will change from ID SEARCH to ID SCAN, repeat the process to return to ID SCAN.
(Remember ID SCAN will ONLY let you hear the talk groups you have stored!)


Now simply wait until you hear someone talk.
When the talk group ID appears on the screen. 


Push YES!


The screen will ask..
Quick TGID Save?
(If you push YES - the scanner will save the talk group ID into a generic group that the scanner defaults to save everything!
If you wish to simply store the talk groups for later review and your unsure of 'who' they actually are, I would suggest pushing YES and then you can review them at a later stage.)


Otherwise if you are confident that you know the talk group displayed on the screen you can allocate it directly to its respective group.
If this is the case...


Push the .NO button.


Screen will then change to read...


Select Group


Now if you have followed my example - you may have already created a series of three or four groups called ,
FIRE
Ambulance
SES
etc etc etc


Depending on who the talk group ID number relates to - you can now use the Volume dial to scroll to and highlight the already allocated group that the talk group ID belongs to.


TIP: If you know that the Talk group ID displayed on the screen is relevant to the Metro Fire Dept - you would not save that ID into the Ambulance Talk Group.


Highlight the respective Group the ID belongs to and push YES


This has now saved the talk group ID into your selected group.


A new screen will appear with the talk group ID displayed.
Edit Name will be highlighted.
At this stage you can no attach a name (alpha tag) to the talk group ID, so next time it appears on the screen it will have a name - making it easier to recognise.


Once completed - push Scan.


If the talk group you have now saved is active - it will now display not only the name of the talk group - but the name of the group as well..


If you have a list of all the talk groups you wish to monitor you can simply manually enter them one by one via the scanners keypad - but this is a slow process and does require a lot of patience.


This can be done at the earlier stage when you are actually creating the talk group ID groups.
When you create the initial 'Group'
you can then enter the actual individual talk group ID


----------------------------------------------------------------------------------


To enter the talk group ID number manually,


Push Menu.
Program System will be highlighted.
Push YES
Using the Volume dial - scroll to highlight the system you wish to add the talk group ID.


Once highlighted, push YES


Using the volume dial to scroll down the screen to highlight Edit Group.
Push YES


Using the Volume dial - scroll to the group you wish to add the talk group ID to.


Once highlighted - push YES


Using the volume dial - scroll down the screen to highlight Edit Channel.


Push YES


Using the volume dial scroll down the screen to highlight New Channel


Push YES


Input TGID will be displayed at the top of the screen...


Input the talk group ID number using the keypad.


Once completed push YES


Screen will then display the talk group ID you have just entered, you can now use the sub menu below to add the alpha tag to the talk group ID.


Once name has been entered push YES.


to enter another talk group ID, push the Menu button after pushing YES and the screen will revert back to prior menu so you can repeat the process again.
Once you have entered your talk group IDs and are finished, push the Scan button.


Processing Please wait will appear briefly and the scanner will commence scanning again.


Congratulations - you have entered a talk group ID!


Version 3.
Updated 5th Feb 2013.


Tuesday, April 17, 2012

Single Frequency Entry - Creating a New System & Group


How to store an individual frequency into a SYSTEM.

To store a frequency you have to create a SYSTEM to store it in.

You can put the frequency into a pre-configured system but if the frequency you wish to store relates to the FIRE Dept and your only existing SYSTEM is a Police SYSTEM it would make no sense and add confusion by putting a FIRE Dept Frequency in a POLICE Dept SYSTEM.  This would be the equivalent in an older Scanner of putting a Fire Frequency in a Police ‘Bank’ with all the Police Frequencies.

By creating separate SYSTEMS you can then allocate them Quick Key to turn them on or off similar to turning a ‘Bank’ on or off on older Scanners.

First thing you have to do is obviously have the correct frequencies ready that you wish to store.

For this example we will use – 491.350 NFM

Push the MENU Button.

PROGRAM SYSTEM should be Highlighted.

Push YES.

Select System should be displayed at the top of the screen.

Using the Scroll Dial – rotate it left or right until New System is Highlighted.

Push YES.

Select Sys Type should be displayed at the top of the screen.

Using the dial rotate it left or right until Conventional is highlighted.

Push YES.

The Scanner will now ask to Confirm?

Push YES.

Now the number of the System you have created will be displayed at the top of the screen.

And Edit name will be highlighted.

At this point you can change the name of the SYSTEM to something more user friendly instead of a simple number.

Push YES.

Edit Name will be displayed at the top of the screen.


The current SYSTEM number will also be displayed.

To remove this current text from the screen and re-name the SYSTEM, push the decimal point or NO button twice.

You now have a blank entry point to create your own SYSTEM name.

For example let’s call it FIRE DEPT.

To enter FIRE DEPT – Use the scroll dial to rotate left or right until the letter you wish to use is highlighted.

The first one we want is F.

Once F is highlighted, push the 6 button.

This will move the cursor to the right so you can enter the next letter, I.

Using the scroll dial – repeat the process until FIRE has been entered.

Now to make a space between FIRE and DEPT simply push the 6 button twice after the E in FIRE, to create a space.

Once the text entry has been completed and FIRE DEPT is on the screen you can save it now by pushing the YES button once.

The SYSTEM now has a name. (FIRE DEPT)

FIRE DEPT will now be highlighted on the top of the screen.

Using the scroll dial – rotate it down until Edit System Option is highlighted.

Push YES.

Set Quick Key will be highlighted.

At this point you can now allocate a Quick Key to the SYSTEM so you can turn it on or off quickly via the scanners keypad.

Now if you don’t already have a SYSTEM that has a quick key you can put number 1 in if you want?

You can have as many SYSTEMS allocated to the same number as well.

For example – Some users will allocate ALL their EMERGENCY SERVICES SYSTEMS to quick key ONE.

And their PUBLIC SYSTEMS to quick key TWO.

Then they can alternate between what they want to listen to with the push of two buttons.

Push the YES button to set your Quick Key button.

Using the scroll dia,l rotate to highlight number 1.

Push YES to save your selection.

Now to enter the Frequency – you need to Push the Menu button to return to the previous Menu.

FIRE DEPT should be displayed at the top of the screen.

Edit System Option will be highlighted.

Using the scroll dial rotate it until Edit Group is highlighted.

Push YES.

Select Group will be displayed at the top of the screen.

New Group will be highlighted.

Push YES.

Group 1 will be displayed at the top of the screen and Edit Name will be highlighted.

Push YES.

Repeat the process as mentioned before to change the name of the Group.

Edit Name will be highlighted.

Push YES.

Push the NO button twice to clear the current text.

Inside each SYSTEM  you have groups. These groups can be useful to store relevant frequencies for each individual user inside the Fire Dept System.

For example Your System is called the FIRE DEPT, but inside that SYSTEM you may want to create a series of smaller individual groups that relate to other users that all come under the FIRE DEPT `Umbrella’.

There might be `Dispatch’ would be Group 1

Rescue might be Group 2

Recovery might be Group 3

Each Group may have four or five individual frequencies allocated to their ‘Section/Region/Area.’

We won’t get to involved in this just yet as this is a whole other section, so for today’s lesson stick with one group!

Let’s call this group `Local Region’.

Once you have typed in `Local Region’

Push YES to save your text.

Now the top of the screen should show LOCAL REGION.

Using the scroll dial rotate it until Edit Channel is highlighted.

Push YES.

Finally after all your hard work you can now enter the frequency!

Select Channel will be displayed at the top of the screen.

New Channel will be highlighted.

Push YES.

Now you can type in 419.350 (or whatever your frequency may be.)

Now push YES to  save.

Now the frequency will be displayed at the top of the screen.

Edit Name will be highlighted.

At this point you can now give the frequency a name if you desire!

Handy when they actually use the frequency as your scanner will then display the users name.

419.350 may be your Regional Fire Dispatch frequency – so typing in Reg Dispatch, means it will come up on the scanners screen when they talk.

If you want to name the frequency – repeat the text input method as explained earlier.

Once you have entered the name of the frequency,

Push YES to save your changes.

Now at this point you are pretty much ready to scan this frequency.

You have created a SYSTEM and you have created a group inside the SYSTEM to allocate the frequency to.

Now all you have to do is push the SCAN button and your in business!

If you want to check its going correctly you should see FIRE DEPT come up on the screen and a small number representing your SYSTEM showing on the SO line of the scanners screen.

(SO meaning SYSTEMS OPERATING)

Good luck.

Any issues – email me at ubcd396xt@bigpond.com

SD Card - Handy tips and tricks to help navigate the installed data.

Handy tips and trick when using your updated Ozscan SD card. Please click on the link below to go directly to an online instruction manual. ...